How to let your members sign in with your organization's own identity provider, test it safely, and decide who gets in and with which roles and groups.
For administrators who hold the permission manage configuration, working together with whoever administers your identity provider.
What changes for members
Keel Platform can hand sign-in over to an OpenID Connect identity provider your organization already uses, such as the one your organization already uses for its office accounts. While one is set, it is your members' only way in:
- Members sign in at the provider (see Signing in). Passwords, authenticator codes, password links and staying signed in all stop working.
- Anyone the provider admits becomes a member at their first sign-in. An existing member is linked by their email address.
- Members' email addresses and display names follow the provider at every sign-in.
- Roles and groups named in the mappings are held exactly while the provider says so, checked at every sign-in. Everything else is still granted by hand in People and Groups.
- Deactivating a member in Keel Platform still keeps them out, whatever the provider says.
Before you start
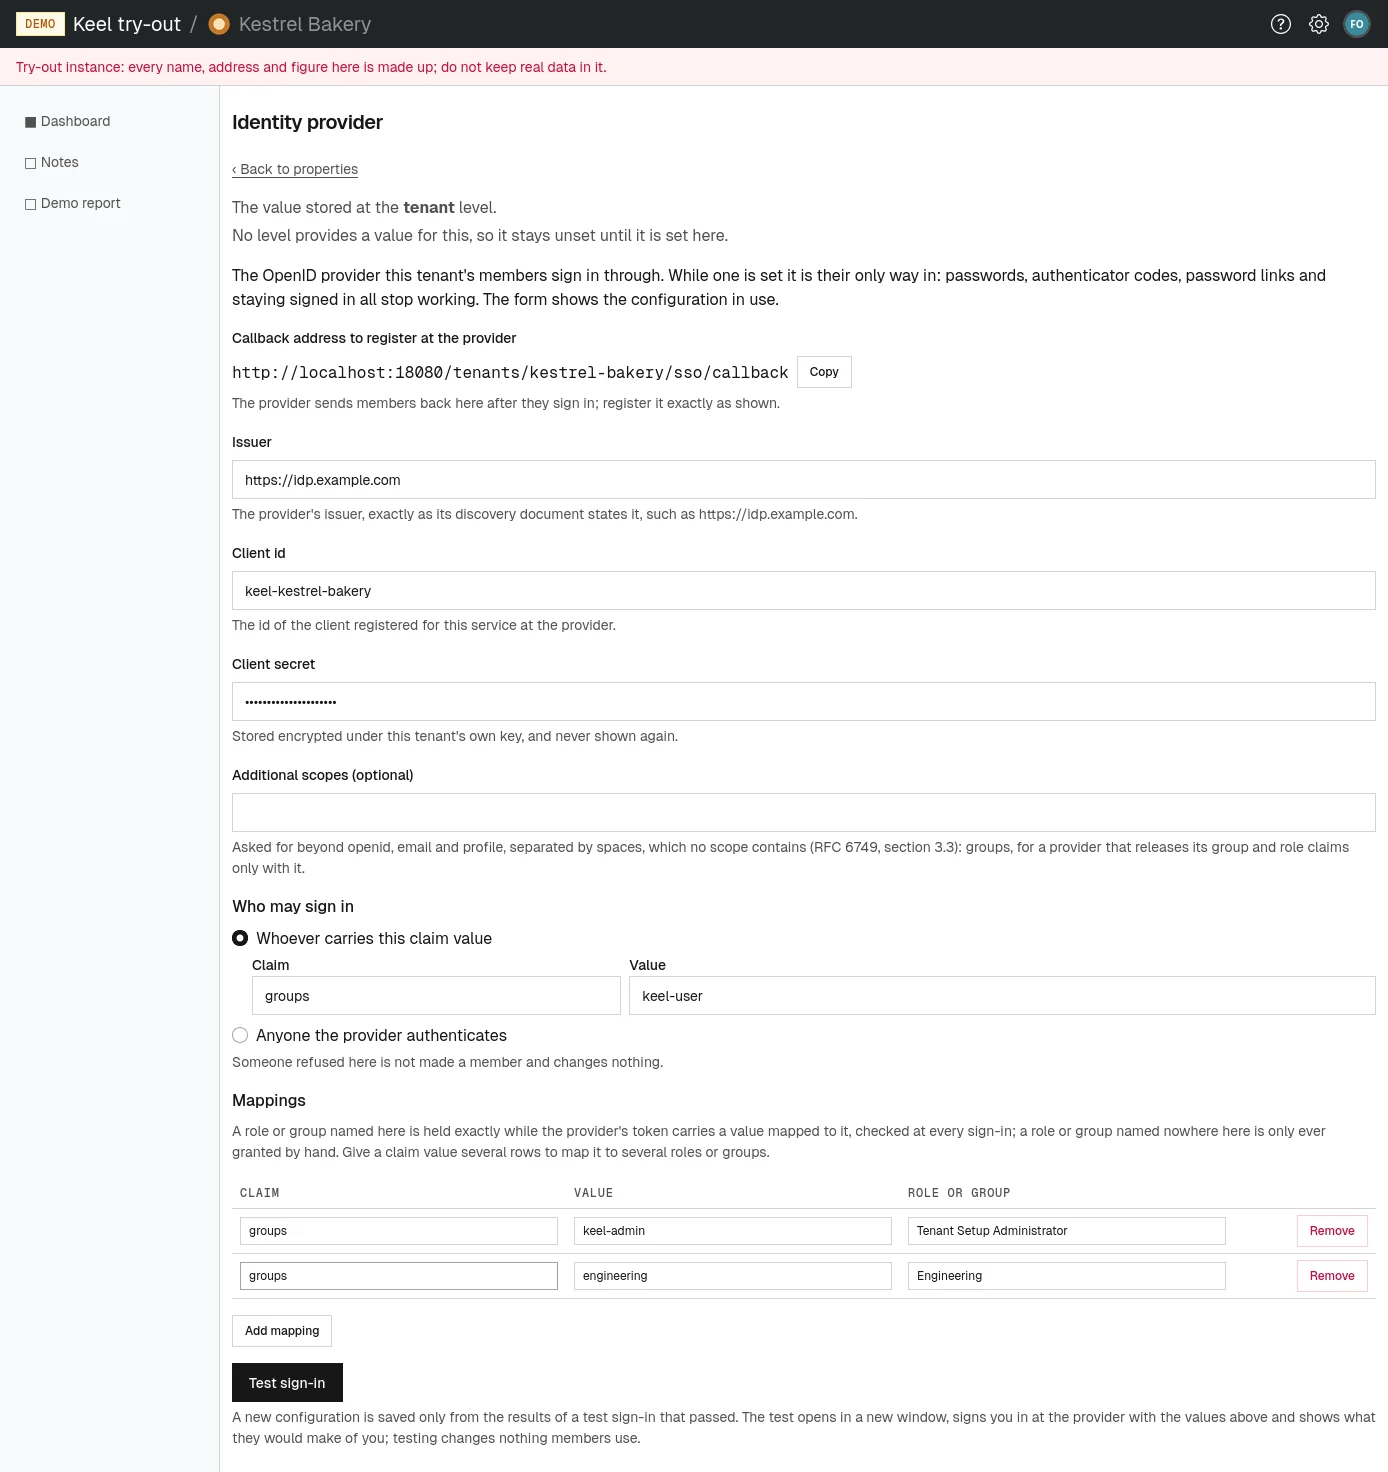
At your identity provider, register Keel Platform as a client (an "application"), and note its issuer, client id and client secret. The provider needs to know where to send members back after they sign in: that is the Callback address to register at the provider, shown at the top of the Keel Platform page with a copy button. Register it exactly as shown.
Decide also which claim tells Keel Platform who belongs to your organization (often a group, such as keel-user) and which claim values should give which roles or groups.
Filling in the configuration
- Open Configuration in the administration and choose Identity provider.
- Copy the Callback address to register at the provider and register it at the provider.
- Fill in Issuer, exactly as the provider's discovery document states it, such as
https://idp.example.com. - Fill in Client id and Client secret. The secret is stored encrypted and never shown again; later, leave it empty to keep it.
- If your provider releases group or role claims only when asked, add the scope into Additional scopes (optional), for example
groups. Keel Platform always asks foropenid,emailandprofile. - Under Who may sign in, choose who is admitted (see Who may sign in).
- Under Mappings, add a row for each claim value that should give a role or a group (see Mappings).
- Choose Test sign-in. Nothing is saved yet; see the next section.
Who may sign in
- Whoever carries this claim value
- Enter a Claim (such as
groups) and a Value (such askeel-user). Only people whose sign-in carries that value are admitted, whether the claim is that exact text or a list that contains it. This is the usual choice: your provider may know many more people than should use Keel Platform. - Anyone the provider authenticates
- Everyone who can sign in at the provider becomes a member.
Someone refused is not made a member and nothing about them is recorded as a member. They see a page telling them to ask an administrator of your identity provider for the missing value.
Mappings
Each row of Mappings has a Claim, a Value and a Role or group (type its name and pick it). A member whose sign-in carries that claim value holds that role or belongs to that group. Use Add mapping for another row and Remove to delete one. To map one value to several roles or groups, give it several rows.
A role or group named in any mapping becomes managed by the provider:
- At every sign-in Keel Platform grants it to members who carry a mapped value and takes it away from those who no longer do.
- You can no longer grant that role to a person by hand, nor add members to that group by hand. Their pages say so.
A role or group named in no mapping is only ever granted by hand, as before.
Testing and saving
A new configuration is saved only from the results of a test sign-in that passed. Testing changes nothing your members use.
- Choose Test sign-in. A new window opens and takes you to the provider, which signs you in with the values you typed. Your form stays as typed in the first window.
- Read the Test sign-in page that opens. If it says "The test failed", it says why: close the window, correct the form and test again.
- If it says "The test passed", check what the configuration would make of you: Subject, Admitted by, Would hold and Would not hold, and the table Claims the configuration reads. A yellow warning says if you would not be admitted, or if no mapping would give you any role or group.
- Choose Save this configuration and confirm "Save this configuration? Members sign in through it from now on, and only through it."
The settings page then says "Saved: members sign in through the tested configuration from now on." The save works only within an hour of the test, and only if nobody tested another configuration since; otherwise test again.
Checking the stored configuration
Once a provider is saved, the page shows the configuration in use and offers Check the stored configuration. It contacts the provider again, reads its published keys and tries the client's credentials, without anyone signing in, and shows the result beneath the button. Use it when members report trouble signing in, or after the provider's administrators changed something.
To change the configuration, edit the form and go through Test sign-in again; the client secret can be left empty to keep the stored one.
Going back to passwords
- On the identity provider page, choose Clear this value and confirm.
Members sign in with passwords again from then on. Members who joined through the provider have never had a password: they choose Send me a password link on the sign-in page to set one (see Setting your password). Roles and groups the provider managed are no longer managed: from then on you grant them by hand. Check them in People and Groups.